
Makeup application is an art form that allows individuals to express themselves creatively while enhancing their natural features. Knowing where to apply makeup on your face is crucial for achieving a flawless and polished look.
In this guide, we will explore the different areas of the face and provide detailed insights on where to apply makeup for optimal results.
Where to Put Makeup on Face?

- Preparation:
Before diving into the specifics of where to put makeup on your face, it’s essential to start with a clean and well-moisturized canvas. Begin by cleansing your face to remove any impurities, followed by the application of a suitable moisturizer. This ensures a smooth base for makeup application.
- Primer:
Apply a makeup primer to create a smooth surface for your foundation and prolong the wear of your makeup. Focus on areas where makeup tends to wear off quickly, such as the T-zone (forehead, nose, and chin).
- Foundation:
Apply foundation evenly across your face, blending it seamlessly into your skin. Start from the center of your face and work your way outwards. Be sure to blend the foundation into your jawline and down to your neck to avoid any harsh lines.
- Concealer:
Use concealer to cover blemishes, dark circles, and any areas that need extra coverage. Apply it under your eyes in a triangular shape, extending towards your cheeks. Dab and blend with a concealer brush or your fingertip for a natural finish.
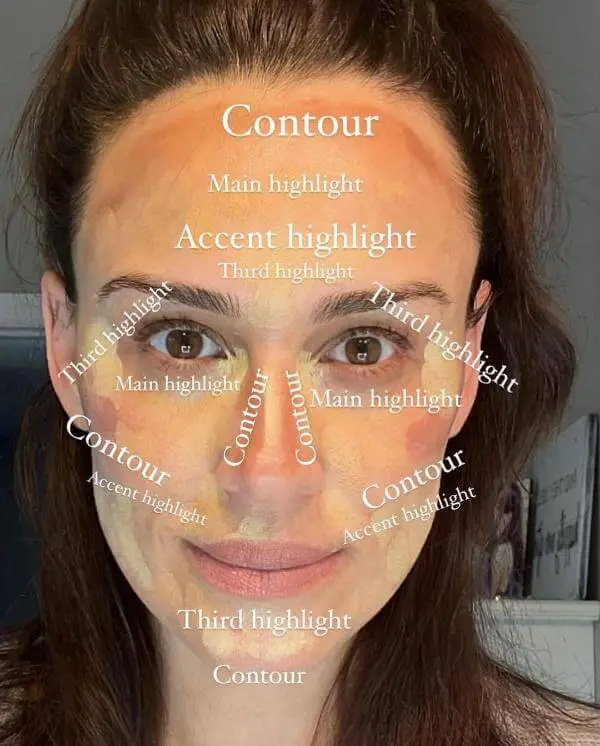
Photo: instagram.com/_sandragoelz_
- Powder:
Set your foundation and concealer with a translucent setting powder. Focus on areas prone to shine, such as the forehead, nose, and chin. Use a light hand to avoid a cakey appearance.
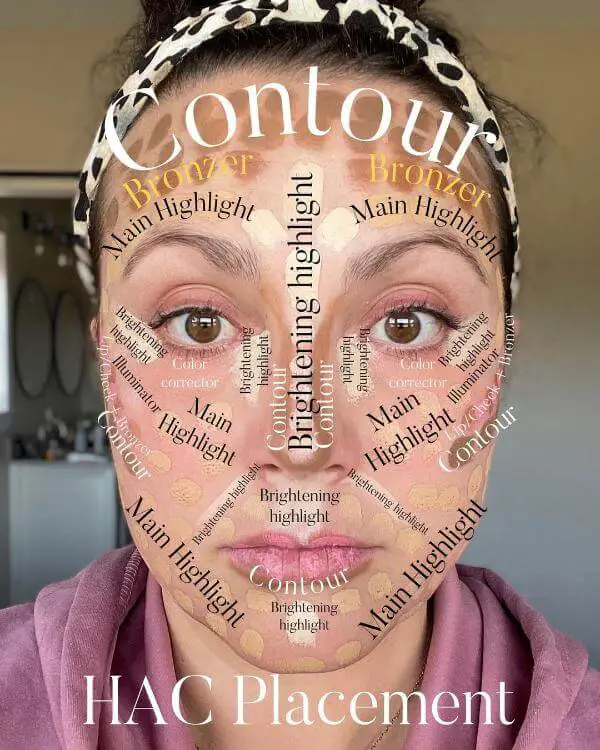
- Contouring:
Contouring enhances the natural structure of your face by defining and accentuating certain features. Apply a contour shade along the hollows of your cheeks, the sides of your nose, and along your jawline. Highlighter can be applied on the high points of your face, such as the tops of your cheekbones, the bridge of your nose, and your cupid’s bow.
- Blush:
Apply blush to the apples of your cheeks for a healthy, radiant glow. Smile to locate the apples, and then blend the blush slightly towards your temples.
- Eyebrows:
Fill in your eyebrows to frame your face. Use a pencil, powder, or gel to achieve your desired shape. Pay attention to the natural arch of your brows and fill in any sparse areas.
- Eye Makeup:
a. Eyeshadow: Apply eyeshadow to your eyelids, focusing on the crease and the outer corners for dimension. Lighter shades can be applied to the brow bone and inner corners to highlight.
b. Eyeliner: Line your eyes with eyeliner along the lash line. Adjust the thickness and style according to your preference.
c. Mascara: Apply mascara to your lashes to open up your eyes and add definition. Wiggle the wand at the base of your lashes and then comb through to the tips.
- Lips:
Outline your lips with a lip liner and fill in with lipstick or gloss. Choose shades that complement your overall makeup look and skin tone.
Makeup Application Order
| Step | Procedure |
|---|---|
| 1 | Cleanse and Moisturize |
| 2 | Primer |
| 3 | Foundation |
| 4 | Concealer |
| 5 | Powder |
| 6 | Brows |
| 7 | Eye Makeup
|
| 8 | Blush |
| 9 | Contour and Highlight |
| 10 | Lips |
Conclusion
Knowing where to put makeup on your face is essential for achieving a polished and professional appearance. Whether you’re a makeup enthusiast or a beginner, following these guidelines will help you enhance your features and create a stunning makeup look that suits your style.
Experiment with different techniques and products to discover what works best for you, and most importantly, have fun expressing your creativity through the art of makeup.
