
So, you go out and purchase a suit jacket, and when you put it on, you have high hopes that it will feel amazing, but it doesn’t.
Exactly what issue are we facing here?
It’s a little too big around the waist. A closely tailored fit is the key to looking like James Bond when wearing a suit.
Here, I’ll explain how to tailor your own suit jacket and how to slim down your suit jacket at home.
What You Will Need?
The following is a list of the things that you will need to get started:
- A sewing machine
- A needle for sewing
- Closely matched thread to your fabric
- Sewing pins
- Safety pins
- A chalk or a fabric pencil
- A ruler
- A seam ripper
- An iron
Step Number One – Measure and Pin
There are two approaches that we can take in order to obtain accurate measurements of the amount of fabric that has to be taken in.
The first option is to take a jacket that you currently own that is the perfect fit and use it as a template. This is the easiest method.
Place your jacket on the flat surface, and make sure that the top button is fastened before proceeding.
Put your best-fitting jacket on top, making sure the shoulder seams are aligned.
Measure the difference at the thinnest region of the waist using your ruler. Make a note of the number, because you’re going to need to remember it at a later time.
My jacket is going to undergo a four-inch waist reduction that will be distributed throughout the back seam and the two rear side seams.
But what do you do if you don’t already own a jacket that fits you perfectly that you can use as a template?
In that scenario, you will need to work out the measurements on your own.
Put on the jacket and make sure the button at the top is fastened.
To get the fabric to fit as closely as you want, pinch it near the rear side seams. After that, you should secure it with a safety pin.
It should fit snugly against the body, but if the front button is pulling and making an X, it’s too tight.
Measure the amount of fabric you pinned using your ruler. Keep in mind this number for later.
You can go ahead and take out the safety pins.
If the inside of your jacket is lined, you will need to use your thread ripper to remove the lining from the bottom of the jacket.
After that, you should turn the jacket inside out and lay it down on a flat surface.
I’m going to mark three quarters of an inch in the middle of each side seam using the measurement from before.
I’ll taper the side seam into the top of the vent because my jacket has two vents. The line will continue to rise while gradually tapering it into the armpit.
We would taper to the very bottom side seams if the jacket had just one vent.
Because there is no center vent, I will repeat this on the middle seam, marking a half-inch and tapering down to the bottom of the jacket.
Taper to the upper back.
Make sure that all of your tapers are gradual and smooth. Ugly dimples will result from sharp edges.
Keeping in mind that the fabric is doubled over, we end up with 1.5 inches from each side seam and 1 inch from the back seam, giving me the total of 4 inches I needed.
You’ll need to take your own measurements to get an accurate estimate.
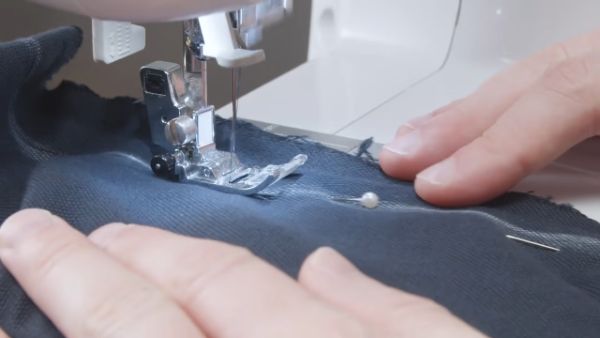
Insert sewing pins to put the fabric in position.
Make sure the pins are facing the direction you’ll be sewing so you can remove them quickly as you go.
How do you determine where you need to go?
Keep in mind that the left side of the sewing machine will collect the majority of the fabric.
Step Number Two – Let’s Sew
Install the matching thread, then have your bobbin ready.
Okay, let’s go ahead and do this.
You’ll use a straight stitch for your sewing. Choose a stitch length of 2.5 mm.
Start by placing a few stitches.
Make a few back stitches after that. This secures the thread and stops the stitch from unraveling.
Remove the sewing pins as you go and carefully stitch down the line you drew with your fabric pencil.
Make sure that you sew in a line that is straight and even.
You don’t want to move in a zigzag pattern.
Finishing with a few back stitches will complete the task after you have reached the end.
Just carry out the same operation on the other two seams.
It’s time to put the jacket on and determine whether you like how it fits.
Continue removing more fabric if it’s still too loose. If the final result is too tight, the new stitches should be removed and the process restarted.
Step Number Three – Cleanup
Press the jacket once you’re happy with how it turned out.
Open up the old stitching with your thread ripper.
Adjust the temperature on your garment iron so that it is appropriate for the fabric you are pressing.
It is best to use a pressing cloth while ironing wool to prevent heat damage to the delicate fabric.
My jacket is made of linen and cotton, so it can withstand the iron’s heat.
For a beautiful, flat finish, press all the seams you worked on.
Turn the jacket’s right side out. The liner needs to be reattached at this point.
Take a needle and some thread, and then tie a knot. The liner will be manually sewed to the jacket.
Grab a few threads from the liner with the needle, then repeat with the jacket material.
If you accomplish this correctly, you won’t see your thread protruding through the jacket or liner’s exterior.
Work your way down the entire liner, and then tie a knot by making a loop at the end and pulling your needle through it.
Make sure it’s good and secure by repeating this two times, and you’re done.
Those are the results, gentlemen. You look great on that jacket. Bond himself would be pleased.